Showing posts with label Character 2 - The Boatswain. Show all posts

Friday, 6 May 2022

The Boatswain - Final Review

 06/05/22 - Week 17


Now that I have finished my projects I will review them over and see where I went wrong, could have improved or what I am pleased with and proud of. 

The Boatswain was the second project that I started in my FMP. I wanted this character to be a bit more stylised and have a bit more complications in it considering the simplicity of the first. This concept really fit the bill, I was also a fan of the style used by the artist and was hoping to replicate it. It also produced the challenge of weapons which is not something I've necessarily approached properly before.
Concept by Venus Bambisa:

I think this is probably my least favourite of the 3 projects simply because I don't think I hit the mark with the sculpt. Proportionally and stylistically, it is wrong. I did purposefully change the length of the trouser sag because it would cause many issues with rigging but this must have thrown me off with the proportions, I noticed this when comparing the placements of the guns and belts on the body. I think this sort of throws off the design features of the concept and I am not happy with the outcome as much as I could have been even though the changes that needed to be made is just a slight lengthening of the legs and enlargement of the boots, or boot cuffs. Similarly to the first project, I also needed to try to get a better representation of the style especially on the face, I tried much harder with this sculpt to get the style as accurate as possible but I still feel I missed the mark slightly. 
I did end up having to rush the weapons a bit too which is a shame, I didn't enjoy creating them too much but I learnt a lot about stylised weapons in general and my approach next time would be very different and with a lot more care in it.
Overall, I did feel that my sculpting skills were getting a bit better and the quality did improve, I just needed to apply this better.

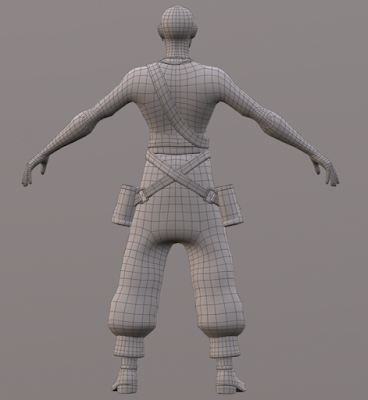
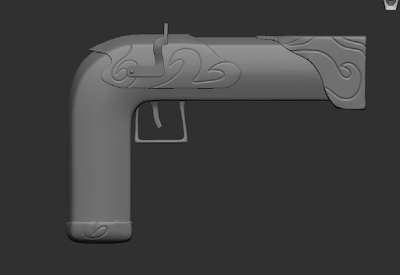
Retopping went alright for this character though I do think in some places I could have evened out the topology a bit better like the trousers and some places on the face. I also had to figure out how to retop the weapons which I ended up redoing as I went very low at first, some of the parts were a bit hard to understand where to place loops and I definitely could improve on weapon topology as I think the outcome looks a bit messy.
The textures on this project were also something that I struggled with, at first I took an approach like the previous project which wasn't right as I wanted to replicate the style of the concept. I learnt about hand painting, replicating style and painting in lighting in my third project so I ended up revisiting this one. I am really glad I did this as before I think it looked even less like the concept, so I feel I was able to push this one slightly and give it some improvements. Even so, I think if I had the time to redo all the texturing I would have as it is just so far off how I wanted it to look and far off the concept itself.


Rigging and skinning in this project didn't go too badly but it definitely wasn't as smooth in the animation process. I found 3ds Max quite annoying to animate with especially because I couldn't figure out how to move the pelvis around apart from rotation which severely limited me and made me unable to have the classic idle pose so I had to get a bit more creative. I didn't want to spend too long on the animations so I tried my best here but I think this one probably looks the worst out of the 3. I also struggled with the pose as the one on the concept was in a quite extreme position. which caused some high deformation on the left arm since I haven't added twist bones to my rig. I am hoping it doesn't take away from my character. Again, I would like to get more into rigging and understand it more as I found it quite fun to bring my characters to life.


For lighting and presentation, I did end up changing the lighting a bit from the concept as I thought it was a bit flat and dark so adding a second back light and slightly changing its position really helped to make the character stand out a bit more. Realising that this character was a bit weak, I also created a toon line shader which I think helped this character a lot to be both emphasized and look more professional, so I am very happy with how this turned out even though the shader isn't the most optimized as that wasn't really what I was looking into.
I also made the decision not to create a proper plinth for this character as I think the set up I've created works well and is much more comparable to the concept. I thought having planks or something of the like would look tacky and not work as well.


Overall, there's a lot I would change with this project and I'm the least happy with it's outcome. I would have liked to improve more on it if I had the time but again, I would want to start over on the whole thing and try to improve from scratch which just wasn't possible in the time that was available. Time wise, I think I gave myself enough for this character but I didn't really have time to go back and fix things such as the gun topology and texturing, this had to be rushed or I had to work long hours to try to fit it in, so definitely more time for error needed to be given.
I feel I have learnt a lot with this project including in Zbrush, understanding texturing and stylised characters so it was a very good experience to have and I think it made it easier to get through my final character. I tried my best on this project and even though it didn't come out exactly how I wanted it I am still happy with it in some ways and I can see the progress and lessons that it gave me.
This concludes my second FMP character project.






Sunday, 24 April 2022

Nia, Boatswain & Blue - Rigging and Skinning

 18-22/04/22 - Week 15

This week I managed to rig all 3 characters. Unfortunately, I fell ill with covid at the end of last week so it did effect me this week and slowed me down. Thankfully, rigging and skinning didn't take as long as I thought it would for each character, so it balanced itself out time wise.


I first started with Nia, this was probably the easiest of the 3 to rig since she has a much more basic design that is tight fit. However, I did come across some issues one of them being my lack of thought into what to delete from each character - wasted tris - which ended up effecting me for another character as well. I think overall something that has effected me in all my projects is lack of forethinking which is where things like wasted planes really show up and make me use more of my time trying to fix these problems.
In the end it wasn't too problematic and I managed to get through rigging this character with relative ease by using a couple of extreme poses to try to get the best rigging I could. I then roughly put her into the position in the concept to get an idea of if my rigging was going correctly and where to adjust. In the end I ended up with the pose below:


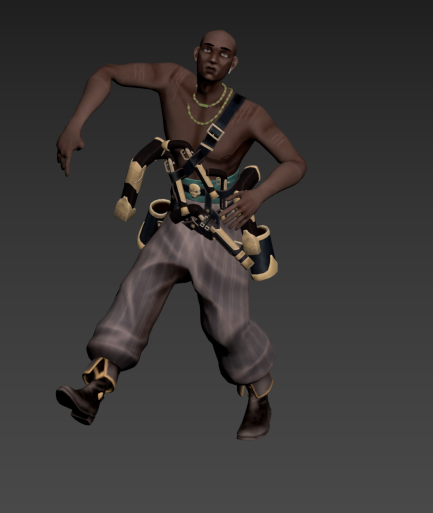
Next, I started on the boatswain. He didn't really have much of a problem with planes that I didn't delete since the base of his character is probably even simpler than Nia's. I used the same process mentioned to work through the skinning process. Though what did trip me up was the belts and also the sagging on the pants. The belts took a while to get through and I ended up changing where they were rigged too a couple times but in the end I managed to get it looking decent. I also used a prop bone for the first time on the guns which was interesting but made things a lot easier for the guns that I planned to move with the hands. The trousers where a bit of an issue and I was trying to balance things between the thigh bones and the pelvis but eventually I got the hang of how weighted it should be to each of these parts.

This was the pose that I've settled with for the moment:


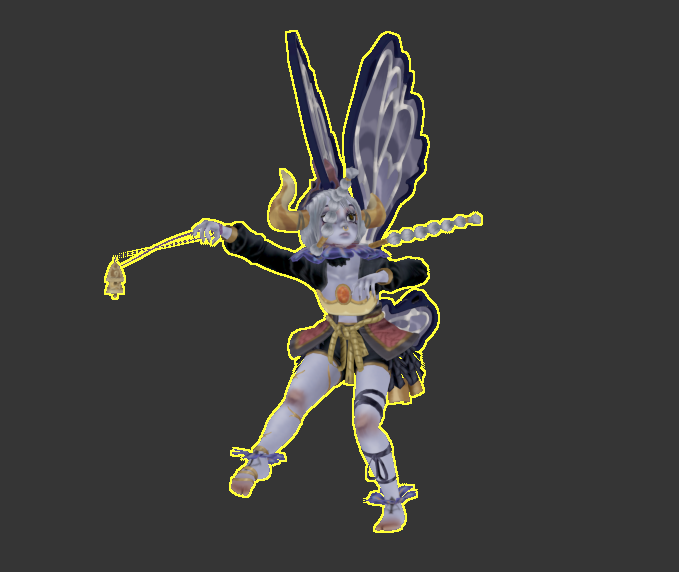
Finally, I moved on to Blue. As expected, this did take me the longest as she is the most complex. This is also where the problem about faces that I didn't think to delete became problematic as things like the neck had two layers that was really hard to access, and trying to see through the mesh when there is so much going on is really difficult. This also happened with the skirt and the shorts even though I couldn't really delete anything here to help cope with this anyway.
I added ponytail bones here, I ended up using 7 on each side as my previous project I tried to minimise on the bones and it created a very clunky look. I then also added extra bones for the wings which I also haven't included before but these were very simple to deal with and made skinning the wings very easy. Lastly, I also included a prop bone for the bells since they are attached to the hand.
I struggled with the skirt and parts hanging from the body a little bit since I wasn't sure where I wanted to rig it too but in the end I settled with mainly the pelvis, but had to do some small adjustments on the parts that touched the body. I also had to mess around with the bodice too as I had a very similar problem. 
Here's her pose:


Overall, I'm really happy with the rigs that I managed to create this week and I think it's going to be a good base for my animations next week, though obviously its pretty easy to adjust if I need to.
My plan for next week is pretty similar to this weeks, around 1.5 days per character for both morph targets and animation which I plan to do all by hand. I haven't animated before so it'll be interesting but hopefully I'll get a good result.


Sunday, 17 April 2022

Nia, Boatswain & Blue - Engine

 13-15/04/22 - Week 14

To finish this week off, I have just been in engine and creating some basic lighting setups and also some plinths for a couple of my characters.


I didn't tweak Nia's lighting all that much but I did add a small base for her to stand on and some of the feathers. I decided to approach these plinths by mirroring what's in the concepts or something of the like, so Nia's was quite simple. I still want to add the crows in which I unfortunately didn't manage to make progress on this week.


As for the boatswain, I'm still considering my options with the plinth as he doesn't have one in the concept, though he does have a graphic behind him and a shadow in front - so I am hoping to have something of the like in this presentation. As for lighting, I wanted to keep it quite simplistic and not too colourful alike the concept. Looking at this screenshot now I am thinking it may benefit from a stronger rim light possibly on both sides, so perhaps I need to stray a bit from the original concept here for presentation purposes.


For blue, I found a concept by the same artist that had a fairy-like feel and tried to take inspiration from the ground included there. I think this really ties in nicely with my character as its very foresty and I like how the colours don't take anything away from her. As for the lighting, I again realised it wasn't too contrast-y or had much colour in it at all. This makes me think with these two characters I will be using quite a bit of post process to play with the contrast and saturation to try to get the effect I want. Again, looking at this now it would definitely benefit from either a rim light or a visible main light source.

Moving on to next week, I need to start implementing the poses and animations for my characters so this will mean rigging. I am a bit concerned with rigging especially for Blue since she is quite complicated, so I have left the whole week for rigging. That means about 1.5 days per character.


Sunday, 3 April 2022

Boatswain - Texturing

 28-01/03-04/22 - Week 12

This week I have completed the textures for my second character.
For this one I took a bit of a different approach since the style of the concept is quite stylised and I wanted to show that more in my texturing. I tried to apply shadow and light in the areas that the concept does to try to improve the overall accuracy and likeness.

I ended up struggling with this quite a bit and had a lot of passes to get the effect I wanted, looking back on it now I just needed to go in strong from the start instead of trying to make it still look blended and soft which isn't really like the style I'm following at all. I think in the end I started to take a similar approach that I did to my previous character.
I also was struggling a bit with the amount of roughness variation and ware to add to my character, I struggle with this as a whole for stylised pieces as I find that dirt is usually either very obvious or not at all present and I found the latter in this concept even though in reality you could imagine that the clothing and accessories would be much more worn. I tried to get a good balance here but I think I have been thrown quite off path with this character, I could try to improve this but with the time left I need to first get the more major aspects out the way before going back over this for another pass.

Probably the part I am most happy with is the skin since I feel I managed to achieve a good roughness to produce a quite accurate look.

I did try to get a bit more dirt in on the guns and looked through a lot of reference for stylised weaponary and how they include ware, I found that most of it was placed in during sculpting, such as scratches, so I definitely will keep this in mind next time. I think I didn't really think about this as the weapons appear so clean on the concept. Adding a little bit of dulling on the barrel of the gun helped it look a bit more natural I feel.


I think texturing this character has really made me aware of the lack of likeness that I have achieved on this project, I don't think my sculpt is as strong as the other two and texturing has not helped this as much as I would have wanted, so I am overall a bit disappointed. 

My plan for next week is similar, just work through the week and get the textures done as I go:


Saturday, 26 February 2022

The Boatswain - Retop

21-24/02/22 - Week 7

This week I retopped my second character, this did end up taking longer than I'd planned so I am now behind by a couple of days so I will have to overstretch my retop plan.

I took a very similar method as my previous character, starting with a very low top base then adding onto this using turbosmooth. I managed to create the body and face rather quickly but the amount of small details and different pieces did slow me down a lot so I ended up getting to the guns a lot later than I would have wanted. I do think that the retop in comparison to the previous character is stronger, though I have been given some feedback to emphasise the sharp edges more using more loops in that area, so I will be adding this in before texturing.


The guns were much harder to retop and I struggled a lot with the amount of topology to add in and where specifically this should go. Looking at these now they definitely just need more loops added into them and this should even out the topology and give a better, more clean look overall. They are very low at the moment and I don't necessarily need that since the character ended up being a reasonable tri count, I can definitely afford to add some more in to tidy everything up.


To me, it was quite surprising how long this took in comparison to the previous character, but this has taught me that I need to be much more realistic, to combat this I have decided to cut into the time I need for my hair cards and try to catch up with retopping my next character and tweaking this one, I have given myself a week for the 3rd character so I am really hoping this is enough as this is all my spare time. As a stretch goal I could hopefully unwrap but if not I can cut into my texturing time.
Heres the edited plan for the next week:


Sunday, 6 February 2022

The Boatswain - Sculpt Pt.2

 31-03/02/22 - Week 4

This week was made up of finalising my second sculpt. I created weaponry for the first time and improved my belt making skills so I started off slow but managed to end when I wanted to for this week.
The begging of the week was spent firstly finishing off the shoes and jewellery so that the sculpt was ready for the guns and belts/straps. There wasn't much to this though it was good to finally have the main sculpt finished.


The guns proved a lot harder than I originally thought. I wasn't sure what was best to create my base in, Max or Zbrush. I am not the best with ZModeller so I thought that Max would be my best option. I am unsure whether this was the right option to take but I ended up slowly figuring out what was the best way to approach guns in Max. With some help from my classmates I decided on using a loft to create the base shape and then using turbosmooth to help with the rest. This took me a while to get the hang of and get the right topology/shapes in there. I also had to gather lots of reference of the types of guns portrayed and some of them were a lot more fantasy than I thought and some parts were very unrealistic. I went with trying to replicate the guns I could see in the concept since this was one of the main things I want to get right, correctly replicating concepts. So logically, my guns don't really make sense and trying to capture the shape intended was a bit difficult and confusing especially with the largest gun. I also decided to create 3 guns instead of 4 as the smallest one does have some differences but they are super minimal and to save time I will just make one of the other ones smaller to fit the concept.
I then followed this up with creating details in Zbrush which wasn't too difficult though sometimes hard to get the program to understand the topology I was trying to go for which made subdiv a bit pixelated occasionally. By the time I had finished the guns I had taken up most of 3 days which was over my max limit that I wanted to go for, ideally I could have finished these quicker if I'd understood it from the get go.


I used up the last part of Wednesday and then the majority of Thursday to create and finish the belts and holsters. This was just time consuming as I am still not the best at more hard surface properties in Zbrush so getting the topology and shape right was again a problem. It was mainly a case of using the curve tool and adding in new tools to add on each part. I then used the rest of Thursday to polish the character off and make sure everything looked to a standard that I was mostly happy with for times sake.

Now I have finished this sculpt, I do have a bit less time for my third and final character which I am not too confident about since this is probably the most time consuming one since it is so intricate. Hopefully with my skill building in zbrush I will have sped up enough to get this finished on time, I am willing to give up at most 2 days the week after but I will need the majority of that time for retop and unwrapping.
Here is my plan:


Saturday, 29 January 2022

The Boatswain - Sculpt Pt.1

 25-28/01/22 - Week 3

This week was spent starting my second character, The Boatswain. I didn't manage to get everything done this week as Monday was spent finishing my first character and there was some finicky things to sort out in this project so far, and there will be more to come so I think this character will end up taking me a couple more days than I originally planned.

This was the first draft of the head, the head was something that I took a lot of time on in general as I wanted it to look right with the style of the concept. This was the first variant that I left to come to look back on the next day. I used references from traditional African body and facial scarring for the patterns on the face as I could see depth in the concept which led me to believe this was the inspiration/origins of the character's markings.
I tried to get the pointy & defined nature of the style down and did succeed but I felt the overall shape was off.


The next day, trying to understand where I was going wrong, I decided to do some quick sketches to help me understand the face from a front on and side view perspective. I did this a bit for Nia but I tried to put a bit more detail and thought into it here and this ended up really helping, even though my drawings are still a bit off.


I then progressively changed the shape of the head, I also added in the same eyes and eyebrow expression from the concept to help me gauge some of the features, like the eyes that felt very off to me. I found that the structure needed to be more blocky and the eyes needed to be much smaller, eventually, as you can see on the right I managed to get somewhere that read more like the concept.


After reaching this point, I reworked the cheekbones and smoothed some parts out to finalise the face. This outcome is much better and much more like the concept than the first sculpt. The only problem is that this ended up taking me the most part of 2 days so this also put me behind schedule for this week. 


By the end of Wednesday I managed to finish the rough blockout of the body which I then worked on through some of Thursday to define the shapes I saw in the concept. This was tricky to me at some points as I wanted it to still be anatomically correct, but at some points the concept really went against this, finding the balance between the two was hard but in the end I think I am happy with my outcome. As you can see, to save time I didn't define the lower part of the body as this will be covered by clothing.


Thursday and Friday were spent working further into the sculpt, I added some jewellery, the satin wrap and the trousers in. I made a decision with the trousers to make them a bit less low as this would cause a lot of issues when working with rigging and skinning. I think I managed to come to a reasonable compromise with the height of them. The belt ended up taking quite a while as I wasn't using the right tool at first, I was unaware of one of the curve tools that snapped to the form and was instead using a regular cure tool and shaping it to the body manually. Eventually when I was aware of this it allowed me to speed up a bit, but it still took me some time to fix the errors using the previous method and make sure everything looked smooth.
Originally I was going to use marvellous for the trousers but I ended up skipping this out for this project, this is mainly because I was already a couple days behind and creating stylised clothing like this is not really out of my comfort zone so I ended up just sculpting them without the use of marvellous, though I still do want to try to learn this at some point during my FMP.


On Friday I was also given some feedback on the trousers, the folds weren't in the right place and were unrealistic so I quickly found some better reference and reworked these and think I came up with a much better looking item of clothing.
I also started on the shoes and managed to get the basic shape down by the end of the day to try to get myself in a better position for next week.


Overall, This week I tried to make as much progress as I could but some things just take longer than I expect them to. So I have factored these in for next week and will hopefully be done by Thursday, giving myself a couple extra days than initially planned. Some of the things I will be tackling next week like weapons will most likely take me a couple days since I haven't approached weaponry before.


Saturday, 15 January 2022

FMP Planning & Project Start

15/01/22 - Week 1

I've chosen to do the character brief for my FMP project. This involves creating a minimum of 3 characters that are fully rigged, posed and game ready.
I chose to abide closely to the original brief, this time not making my own concepts after getting negative feedback towards my concept for the previous character brief and considering this is my FMP, I didn't really want to take too many risks in terms of how visually appealing and conceptually interesting my work is. 
My main focus then falls back on the quality of the characters I'm creating since I do not have the concept part involved. To compensate, I want to try to learn how to create game ready hair cards in xgen and hopefully get some basic understanding in marvellous too. This should amp up my industry standard techniques and create stronger portfolio pieces.

I started on artstation to find some interesting and appealing concepts or illustrations that I could recreate. I had a few things in mind to narrow down my search which included variations in race, age, body type and importantly to me, style. I didn't want everything to be one style and I hope to recreate the styles of the concepts I have chosen which will provide me with a wider portfolio that shows I am willing to abide to any style, though I am focusing on more stylistic characters.
The search was hard as I had to keep all of these things in mind whilst also thinking about how appealing the concepts were to me and others, I tend to like specific aesthetics and though I have pandered towards that a bit I tried to make it a bit more neutral and appeal to a range of people. Eventually, I found a few that I liked from 3 different artists and I requested their permission to recreate their work in a 3D medium, thankfully I got a response from all of them later that day and they all agreed.
Here are the concepts I have chosen:

My first character I hope to display a more semi-realistic style with more realistic proportions and also definitely include the xgen hair I previously mentioned. There will be challenges with the intricacy on the clothing and the fact that I am more used to a stylistic process now.


The Boatswain - By Venus Bambisa https://www.artstation.com/venusbambisa
My second character is much more stylised, though the style is very specific and "pointy" which will be interesting to replicate. The trousers may be a challenge since it may be difficult rig, so I plan to challenge my rigging skills here.


Soft Blue - By Bergamotik https://www.artstation.com/barmaglotik
My third character is something that is very personally appealing for me, I really like the many details of the design and the soft style. I am most excited for this project, though I have not done anything of this scale or quite like this before so I think it'll definitely push all of my skills.

Moving on from this, I started my plan. As I experienced last term planning was super important and I wanted to try to realistically plan the next 17 weeks ahead of me including 1 for planning (this week) and 1 at the end of the project in case of any problems or last minute things I wanted to add in.
I planned this out in excel and will also be planning in more detail my work every week. The excel document sets out when I hope to finish each segment of the projects, I've decided to work on the projects in unison so I can hopefully get everything done in good timing and not end up with some projects being more worked on than others. 


Soft Blue - Final Review

06/05/22 - Week 17 Now that I have finished my projects I will review them over and see where I went wrong, could have improved or what I am...