Showing posts with label Character 3 - Soft Blue. Show all posts

Friday, 6 May 2022

Soft Blue - Final Review

06/05/22 - Week 17

Now that I have finished my projects I will review them over and see where I went wrong, could have improved or what I am pleased with and proud of. 


This is the third and final character I created for my FMP. This character was supposed to be the most stylised which is not something I've tried too much with 3D in general. I mainly chose this concept as the other two were more fitting what I'd set out to find, and this one was much more to my own stylistic interest and aesthetic. I did find that some people were more against this concept and artist than the previous two but I was very inspired and excited by this concept specifically. I think because of this I am a bit bias towards it.
Concept by bergamotik 1137:

This was probably the hardest of the 3 sculpts, purely because there was so much to tackle overall. I also tried much harder to perfect the sculpt especially in the face. Spending some extra time on this character was really beneficial as personally I think that the sculpt turned out the best and most accurate to the concept. I still think there is areas that could be refined but I did end up having to move on, one of these reasons being the sculpted hair which I am probably the least happy with as I wanted it to look more like the concept, which is much thinner and natural looking. I used the same method from first term which I'm not too happy with in general so hopefully once I learn a bit more about sculpted hair I can improve on my methods. For speed purposes, I think it works.


As for retopping, I think this character is retopped best on the body but this also was the highest poly character mainly because of the wings. Looking back on this project now I am a bit confused why I chose to make the wings not planes. I understand that on the concept it sort of has this effect but I don't think it was worth all the effort I went through to make the wings look right when I could have just baked on the details. The wings have a lot of tris to them to make them look smooth, so overall they are just a bit wasteful. Originally I also wanted to try to make a shader for the wings which would have been much easier and acheiveable with a plane rather than an object with thickness. It also provides some obstruction to the clothing and causes clipping sometimes as it needs so much space that wasn't really achievable with the way the character design is. This is probably the only major thing I would change about this project. Apart from that and a few more loops around the crotch area, I think the retop is to the best of my abilities.
I think texturing for this character is the best out of the 3 too, I really paid attention to the style of the artist and tried to replicate that in my texturing. Eventually I got the hang of this and it ended up making my work give the stylised look it needs. This particularly succeeds in the face where there was a lot of colour variation in the concept and I had fun hand painting all of this in. This brings me to hand painting which is not something I have really explored before, but doing some of this in painter was really fun and it makes me want to perhaps learn 3dcoat or understand hand painting more and maybe try to further this skill. I'm super happy with the texturing on this character overall.


Rigging and skinning took a bit longer for this project, as again there was just a lot to deal with and decide what was going where to make it look the best that it could. I also made the same mistake as the first character with not thinking carefully about what topology to delete and ended up having to use some more time with having to deal with planes that weren't easily accessible as you couldn't see them. I ended up also having to revise the retop a couple times whilst animating as the pose was quite hunched over and it meant that I had some problems in the waist area since there was a lot going on there. The animation in the end I think is the best out of the 3 and I think it really brings the character to life, it looks the most natural and professional as I didn't have the restriction of keeping the character on the ground. I used unreal to get round the issue of not being able to move the pelvis, so she moved up and down like she was floating.

 When lighting this character I didn't want to have too many harsh lights as I wanted to replicate the softness of the concept which I think I managed to achieve by creating a more consistent, ambient light coloured light. I also chose to create the plinth from a different concept from the same artist which I think works very well for the presentation overall.


Overall, apart from some structural issues, I really like this character and I think it's the best out of the three. I'm unsure if this is purely because the aesthetic is much more me or if it is because in the end this is the character that I kept visiting last, meaning that I was building skill with each process and this would always be the best result. I planned more time for this character as I went along as I found that it was taking me a while to tackle all the individual parts which I'm glad I realised and deciding to replan around this character is probably what caused it not to fail as I think if I had any less time on anything it would look rushed. With more time I would love to have tried to improve the wings and some issues I can see such as sizing differences in the petals and the way the petals work overall, but I think with the time we were given I'm really pleased with this character.
This concludes my third and final FMP character project.


Sunday, 24 April 2022

Nia, Boatswain & Blue - Rigging and Skinning

 18-22/04/22 - Week 15

This week I managed to rig all 3 characters. Unfortunately, I fell ill with covid at the end of last week so it did effect me this week and slowed me down. Thankfully, rigging and skinning didn't take as long as I thought it would for each character, so it balanced itself out time wise.


I first started with Nia, this was probably the easiest of the 3 to rig since she has a much more basic design that is tight fit. However, I did come across some issues one of them being my lack of thought into what to delete from each character - wasted tris - which ended up effecting me for another character as well. I think overall something that has effected me in all my projects is lack of forethinking which is where things like wasted planes really show up and make me use more of my time trying to fix these problems.
In the end it wasn't too problematic and I managed to get through rigging this character with relative ease by using a couple of extreme poses to try to get the best rigging I could. I then roughly put her into the position in the concept to get an idea of if my rigging was going correctly and where to adjust. In the end I ended up with the pose below:


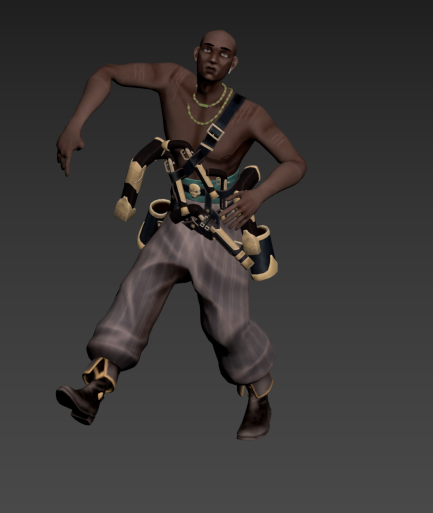
Next, I started on the boatswain. He didn't really have much of a problem with planes that I didn't delete since the base of his character is probably even simpler than Nia's. I used the same process mentioned to work through the skinning process. Though what did trip me up was the belts and also the sagging on the pants. The belts took a while to get through and I ended up changing where they were rigged too a couple times but in the end I managed to get it looking decent. I also used a prop bone for the first time on the guns which was interesting but made things a lot easier for the guns that I planned to move with the hands. The trousers where a bit of an issue and I was trying to balance things between the thigh bones and the pelvis but eventually I got the hang of how weighted it should be to each of these parts.

This was the pose that I've settled with for the moment:


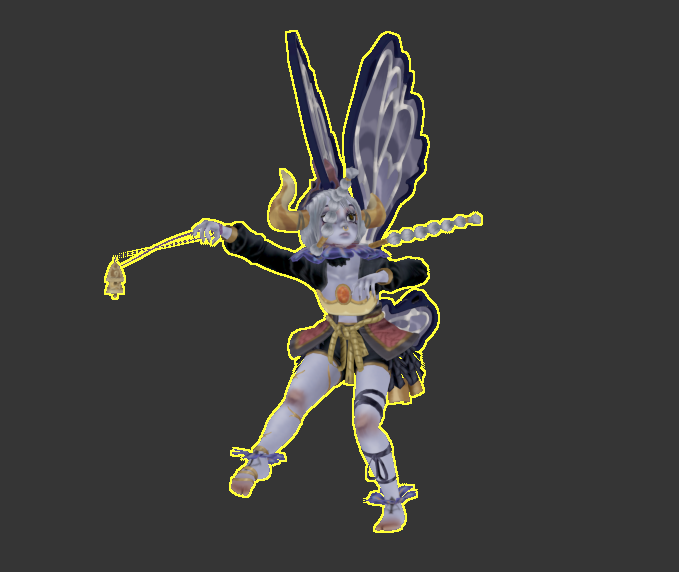
Finally, I moved on to Blue. As expected, this did take me the longest as she is the most complex. This is also where the problem about faces that I didn't think to delete became problematic as things like the neck had two layers that was really hard to access, and trying to see through the mesh when there is so much going on is really difficult. This also happened with the skirt and the shorts even though I couldn't really delete anything here to help cope with this anyway.
I added ponytail bones here, I ended up using 7 on each side as my previous project I tried to minimise on the bones and it created a very clunky look. I then also added extra bones for the wings which I also haven't included before but these were very simple to deal with and made skinning the wings very easy. Lastly, I also included a prop bone for the bells since they are attached to the hand.
I struggled with the skirt and parts hanging from the body a little bit since I wasn't sure where I wanted to rig it too but in the end I settled with mainly the pelvis, but had to do some small adjustments on the parts that touched the body. I also had to mess around with the bodice too as I had a very similar problem. 
Here's her pose:


Overall, I'm really happy with the rigs that I managed to create this week and I think it's going to be a good base for my animations next week, though obviously its pretty easy to adjust if I need to.
My plan for next week is pretty similar to this weeks, around 1.5 days per character for both morph targets and animation which I plan to do all by hand. I haven't animated before so it'll be interesting but hopefully I'll get a good result.


Sunday, 17 April 2022

Nia, Boatswain & Blue - Engine

 13-15/04/22 - Week 14

To finish this week off, I have just been in engine and creating some basic lighting setups and also some plinths for a couple of my characters.


I didn't tweak Nia's lighting all that much but I did add a small base for her to stand on and some of the feathers. I decided to approach these plinths by mirroring what's in the concepts or something of the like, so Nia's was quite simple. I still want to add the crows in which I unfortunately didn't manage to make progress on this week.


As for the boatswain, I'm still considering my options with the plinth as he doesn't have one in the concept, though he does have a graphic behind him and a shadow in front - so I am hoping to have something of the like in this presentation. As for lighting, I wanted to keep it quite simplistic and not too colourful alike the concept. Looking at this screenshot now I am thinking it may benefit from a stronger rim light possibly on both sides, so perhaps I need to stray a bit from the original concept here for presentation purposes.


For blue, I found a concept by the same artist that had a fairy-like feel and tried to take inspiration from the ground included there. I think this really ties in nicely with my character as its very foresty and I like how the colours don't take anything away from her. As for the lighting, I again realised it wasn't too contrast-y or had much colour in it at all. This makes me think with these two characters I will be using quite a bit of post process to play with the contrast and saturation to try to get the effect I want. Again, looking at this now it would definitely benefit from either a rim light or a visible main light source.

Moving on to next week, I need to start implementing the poses and animations for my characters so this will mean rigging. I am a bit concerned with rigging especially for Blue since she is quite complicated, so I have left the whole week for rigging. That means about 1.5 days per character.


Friday, 15 April 2022

Blue - Texturing

 04-12/04/22 - Week 13

This week I worked through my final character to try to finish the main textures for all 3 characters.
I planned a day to finish off some of the retopping and uv mapping that I had left to do for this character, but it ended up cutting into much of my time and I didn't finish getting everything ready until halfway through Tuesday losing a bit of time there. I wanted to really improve on what I was saying last week and really reflect the style of the concept into my texturing work.


I think I succeeded much better this week, I used the shadow and highlights much more efficiently from the concept for this character and also really tried to understand the shading techniques the artist uses. This was really beneficial, as I started to use the sketchy shading that the artist uses in my textures my model was looking accurate and also aesthetically pleasing. I did struggle a bit with keeping up with all the different layers I was using in painter and how this was effecting my roughness overall, but eventually I got a bit more used to it.
I also used a lot of metallic in my textures to make a shiny effect for things like the horns and hair which really helped the piece to come to life a bit more. This was supported by the highlights that produced a fake sheen that helped a lot with the material reads. I also think this technique sort of covered up the fact there was not much ware and tare where there usually would be, as the lines add a lot of texture to the piece without actually doing so.


In the end though, this method did take me a while as I was basically hand painting each asset and this character has a lot of assets so I ended up cutting into my time quite a lot and my plan ended up being thrown out the window as I had to continue texturing into the next week which was rather frustrating as I now won't have enough time to do certain things such as the crows for Nia, even so I do intend to find time for these.


Overall, a much more successful week or so, where I am a lot happier with the outcome of my texturing. I think if I get time I want to revisit the Boatswain and try to implement the skills that I built here to try to improve the textures there. I don't have too much of a plan for the next few days, I just want to get all 3 characters in engine properly and add some details such as the plinth or asset they will be standing on.

Sunday, 6 March 2022

Blue - Retop

28-04/03/22 - Week 8

This week I have been retopping my third character. As I anticipated last week, this ended up taking me a long time and by the end of this week I haven't been able to finish as much as I wanted to initially.

The large majority of this retop was again similar to the previous two characters - creating a rough base and then using turbosmooth to get a good amount of loops. I did end up having to work around a few issues, one of them mainly being the wings which as first I wasn't sure quite how to approach, but I ended up using a very similar method except I just had to be very careful with the placement to make it make sense and work with turbosmooth properly. They are currently very high poly and this needs to be fixed, though I am hoping once I collapse the symmetry on it I will be able to remove unnecessary loops and lower the tri count here.


Another thing I struggled with was the hair, I tried to do some more research on stylised hair and how people usually approached this, though I found that the method that I used for my professional practice character was mostly correct, but I needed it to be tided up a lot more and more evenly spread out. This was a challenge as starting with a low amount of polys then adding loops in didn't appear to work since the geometry that the low poly was conforming to was so complicated and not at all smooth, so I decided to hand retop this. The issue with this is that it took me a very long time and I have now only managed to finish both ponytails, one side of the hair and the fringe. I decided to segment the fringe to try to make this a bit more logical and this really helped in comparison to ways I have done it before - trying to keep everything in a large lump. I also hope this will help with the hair looking more natural. I did consider hair cards for this but I thought as I'd already tried hard with the zbrush sculpt I wanted to keep these, though I am maybe going to make the fly aways into planes.


I have mostly finished everything but I just need to create the low poly petals and place them correctly and then finish off some bits and pieces, but for now I need to move on to hair cards as I have been told that these are very challenging and meticulous. Overall, I think I made good progress and I tried really hard to get as much done as I could this week.


I am away next week, so I will come back the week after and start haircards, I don't have much of a day by day plan as I'm unsure how long each step will take and what each one will be, but here are my theoretical goals for then:


Wednesday, 16 February 2022

Soft Blue - Sculpt Pt.2

 14-15/02/22 - Week 6

To finish off the sculpt for my 3rd project I just had to add in the final details which I did over 2 days due to some technical faults at uni and stressful circumstances that ended up meaning I wasn't able to get as much done as I thought I would be able to on the Monday.

I was only able to add in the petals around the head on Monday and start the bonnet, the petals weren't too difficult to get in and I just plan for these to be planes. I did have to make some slight adjustments around the hair since the length of the petals in the concept don't match up with where the hair falls, to work around this I just made it so the hair goes down  through the petals whilst still trying to keep the original curve.
I then just moved on to the final details such as the bells and ribbons on the legs and hands, then finally the golden leg details and the petals around the ankles.


Unfortunately I did lose a day basically so it will make it a bit more of a push to get all three characters retopped and unwrapped by next Friday. I will have to try my hardest and create a work around if this is not possible, but for the mean time here is my plan for next week:


I plan to start again with Nia and get them done in the order I modelled them.


Friday will hopefully be the day I unwrap.


Sunday, 13 February 2022

Soft Blue - Sculpt Pt.1

 04-11/02/22 - Week 5

Last Friday I started my 3rd and final sculpt, this is my character that will be the most stylised out of the 3 and features less realistic proportion, the style itself is very smooth and rather cute so it will be an interesting contrast from my previous sculpt. I started by collecting some style reference and also sketching out a rough estimate of what the front and side views would look like. For my style reference for this project I was looking at recent disney/pixar films as this has the very soft look with large eyes and a small nose being one of the main features.


I also came up with a very rough version of the face which obviously had a lot of issues, but it was mainly a way to get a basic map for myself so I could improve and find the mistakes on Monday. 


I worked on these issues at the beginning of the week, figuring out the correct proportions of the face and where I was originally going wrong such as the nose and overall face shape. I used the same method as the last project, slowly working on it and comparing it directly with the reference in the same angle. Eventually I came to something much more resembling of the original concept and so I continued on to finish the face area, added in the horns and the details on the face.


On Tuesday I managed to finish the whole body as I wanted to in my plan, I again tried to make this closely resemble the concept's style but I did end up struggling a bit with the proportions as the head is rather large for the body which was throwing me off. I ended on the below by the end of the day though eventually I did end up making the head larger and the neck longer to try to get it a bit closer to what I was seeing in the concept. Another part that I struggled with was the feet, I wanted them to be accurate to the concept as mentioned, which includes a very stylistic impression of the feet with only the big toe being separated. This meant that it was a bit harder to make it look right and take reference from my anatomical references since the concept had played with this so much. I think eventually I came to something that looks like the concept whilst also looking like a foot.


Over Wednesday and Thursday I moved on to the clothing and hair, I used the same brush from my professional brief to create the hair but tried to use it to match the concepts style by adding a bit more detail and layers. I also chose to sculpt the pigtails rather than create them with the brush as I felt it was quicker and resembled the hair's flow from the concept a lot better.
Credit to Art Heroes and Marlon R. Nuñez as the creators and distributors for this brush.
I wanted to try to add a lot more of a stylised feel to the clothing and I achieved this by making each clothing part out of several meshes to give it clean cut edges and more depth. I really like the way this impacted the clothing though it did mean things were a little more fiddly and time consuming.


On Friday I worked towards finishing the character, I added in the wings and some of the details such as the rope belt and parts coming out from the skirt. The wings were probably the trickiest to make, though I ended up approaching these by creating the shape form a mask on a plane and then using zmodeler to extrude this. I had to do this several times for each part of the wing and it did take a while to get it to look right though I think I have managed to come up with something that resembles the wings from the concept.


This is where I currently am with this project, I am hoping to manage to finish on Monday as my plan last week stated, I only have the very smallest details left to do. I am pretty happy with my progress this week and I feel that the quality of my work has improved and sped up so I am able to have a bit more time for quality control.


Saturday, 15 January 2022

FMP Planning & Project Start

15/01/22 - Week 1

I've chosen to do the character brief for my FMP project. This involves creating a minimum of 3 characters that are fully rigged, posed and game ready.
I chose to abide closely to the original brief, this time not making my own concepts after getting negative feedback towards my concept for the previous character brief and considering this is my FMP, I didn't really want to take too many risks in terms of how visually appealing and conceptually interesting my work is. 
My main focus then falls back on the quality of the characters I'm creating since I do not have the concept part involved. To compensate, I want to try to learn how to create game ready hair cards in xgen and hopefully get some basic understanding in marvellous too. This should amp up my industry standard techniques and create stronger portfolio pieces.

I started on artstation to find some interesting and appealing concepts or illustrations that I could recreate. I had a few things in mind to narrow down my search which included variations in race, age, body type and importantly to me, style. I didn't want everything to be one style and I hope to recreate the styles of the concepts I have chosen which will provide me with a wider portfolio that shows I am willing to abide to any style, though I am focusing on more stylistic characters.
The search was hard as I had to keep all of these things in mind whilst also thinking about how appealing the concepts were to me and others, I tend to like specific aesthetics and though I have pandered towards that a bit I tried to make it a bit more neutral and appeal to a range of people. Eventually, I found a few that I liked from 3 different artists and I requested their permission to recreate their work in a 3D medium, thankfully I got a response from all of them later that day and they all agreed.
Here are the concepts I have chosen:

My first character I hope to display a more semi-realistic style with more realistic proportions and also definitely include the xgen hair I previously mentioned. There will be challenges with the intricacy on the clothing and the fact that I am more used to a stylistic process now.


The Boatswain - By Venus Bambisa https://www.artstation.com/venusbambisa
My second character is much more stylised, though the style is very specific and "pointy" which will be interesting to replicate. The trousers may be a challenge since it may be difficult rig, so I plan to challenge my rigging skills here.


Soft Blue - By Bergamotik https://www.artstation.com/barmaglotik
My third character is something that is very personally appealing for me, I really like the many details of the design and the soft style. I am most excited for this project, though I have not done anything of this scale or quite like this before so I think it'll definitely push all of my skills.

Moving on from this, I started my plan. As I experienced last term planning was super important and I wanted to try to realistically plan the next 17 weeks ahead of me including 1 for planning (this week) and 1 at the end of the project in case of any problems or last minute things I wanted to add in.
I planned this out in excel and will also be planning in more detail my work every week. The excel document sets out when I hope to finish each segment of the projects, I've decided to work on the projects in unison so I can hopefully get everything done in good timing and not end up with some projects being more worked on than others. 


Soft Blue - Final Review

06/05/22 - Week 17 Now that I have finished my projects I will review them over and see where I went wrong, could have improved or what I am...