Showing posts with label The Captain. Show all posts

Monday, 10 January 2022

Captain Final Thoughts

10/01/22 - Hand In

I have now completed the captain character project and here is my final thoughts and evaluation on the project as a whole.

This project started off well, I still like the idea I had and the design overall had strong shape and to me, clearly resembled a fisherwoman. I had some feedback over the project here and there and I became less confident in my design over time, some felt it didn't have enough research and thought behind this. The design wasn't really supposed to be the focus of my character and its definitely something I struggle with in general, this has only really told me that I should outsource designs for my FMP as it's not my strong point. I do feel that it lacks the sense of story that the brief required, and I should have perhaps tried to focus a bit more on this aspect and add some specific historic detail here and there.

The sculpt is definitely something I'm proud of. It was my second character sculpt and I can see the improvement and expansion of zbrush knowledge, I do want to challenge myself with adding more smaller details next time. As this was my first stylised sculpt, I had a lot to learn about stylised folds and hair specifically. I got feedback on this and it became apparent that I needed to have delved more into how to create these and research and gather much more reference on what sort of shape language I was going for. This resulted in me having to redo the folds a couple of times which lost me a lot of time, and in the end I still managed to lose a lot of the silhouette and charm of the original design from trying to revert back to a more realistic approach.

I also ended up having some problems with my retop, I tried to save as much as possible which wasn't helpful and I realise now where it would have been better for deformation and smoothing to implement more topology. Overall, the character is much more low poly than I would have liked and would have benefitted, especially in the final presentation from cleaner, more dense topology.

I'm quite pleased with the texturing as not only was I able to finish it to a reasonable time, I think it has the right sense of stylisation that I was going for in my project. Something I would have liked to improve is the eyes since I could have implemented more industry standard techniques and had multiple meshes coving the eyeball. This would have really improved the texturing and presentation for my character. I took a lot of care with the texturing and tried to research it as best as possible and I think this paid off, though there is still room to improve especially with the netting. The way I approached the netting makes the whole thing look quite armature and I think it brings the overall presentation down. If I were to do this again I would have instead tried to make it a mesh instead of a texture and added more layers in to make it seem more realistic.

The overall look of the character in its presented form is definitely an improvement to my first character in many ways, including lighting, pose and presentation of skill. I definitely enjoyed this more than my cart project so I would like to take characters forward into my FMP. I need to consider all the strengths I have here and improve on my weaknesses thoroughly to make sure I can display my skill and abilities.
I learnt a lot and sped up some of my skills massively, so though I am confident for those reasons, there is still a lot for me to learn and understand as I move onto the next set of projects.


Tuesday, 4 January 2022

Presenting the Character

 03-04/01/22 - Week 14

Now I've posed the character and given her a bit of life, I moved onto presenting her in primarily unreal with some work in marmoset for portfolio pieces.
I firstly imported everything into unreal and set up the animations, this was quite basic as it was just a case of selecting the correct timing for the pose then adding on the morph target by adding another animation cycle. 


I wanted to work with my lighting to connotate the sea and the fact that she is a captain. To achieve this I did some research on artstation for the sort of lighting I wanted. I found a lot of pirate/ship captains had at least one strong blue light on a deep coloured background.
I thought to contrast the blue lighting with a warm yellow/orange as I thought this would be like the reflection of sand or light from the sun.
I chose the blue to be the strongest light on the left side as I wasn't a big fan of the large shadow from the hand being casted onto the face as it was distracting and the shadow itself was rather blotchy. My lighting ended up consisting of 4 point lights and exponential height fog to add bloom to the lights, making them softer and adding some depth to the lighting in the background.
I'm quite happy with the lighting I created in unreal as I think it highlights a lot of the best features of the character such as the clothing and also gives a sort of spotlight effect which I feel speaks for the captain side.


To add a little bit more depth to the project, I wanted to add a small particle sequence that resembled dust or fireflies which I managed just through changing some basic cascade settings, the lifetime, spawn and location being the most important. This really added some nice ambience to the scene and filled a lot of empty space, adding more interest to the scene.
I am a bit worried that they look a bit like stars or don't really relate to the scene, but I made them blue to try to make it like sea spray or something of the sort.


The final result with the lighting and particle fx is something I'm quite pleased with but I do worry that I have not made it "sea-like" or related enough to the character itself. I do still feel that it displays the textures and pose of the character nicely though, and the supporting meshes help to fill out the scene and tell you more about the character, putting some context in.


I tried to recreate this quickly in marmoset, with some slightly adjusted colours/lighting positioning as I wanted the a-pose to be displayed so the lighting wouldn't have translated too well. I went for a more tones down lighting scene that looked a bit more like she was perhaps on a boat at night, with the oranges being much more rich and the blues having a bit. more green in it. This is mainly for marmoset viewer use so I didn't spend too much time adjusting things here.


Sunday, 2 January 2022

Rigging, Skinning and Posing the Captain

 29-31/12/21 - Week 13

To finish off the character before creating the unreal scene I wanted to pose my character. I used max for this and also created a morph target for the facial features.


I first started by rigging my character, I decided to add some bones for each of the ponytails so I could pose them properly. Originally I was going to add some for the ropes but since I am not entirely confident with rigging I decided to leave it for this project.


I then created my pose along with a few others and tested my character with the base colour attached, this was to make sure I fully ironed out most of/all of the incorrect skinning. Most of these issues were with the arms and hair. I chose quite an extreme pose for the left arm, which meant that it took me a while to make this look somewhat normal. The hair also took a while as I found parts were attached to lots of different parts and I also needed to play about with the top part of each ponytail and how much this was attached to the head.
Once I'd finished, this was the result I got which I was pretty happy with. I was trying to recreate the pose from my original concept and though I found that in some places this was a bit impossible since my anatomy isn't the best, I created a pose that had the adventurous and bold feel that I was trying to convey.


I then tried to add in the morph target. This is where I was experiencing issues.
Morph targets must have the same amounts of verts that are the exact same as the original mesh. I didn't understand how to separate the head from the body since it was animated and skinned, and this would in effect break the skinning. So the only option was to duplicate the entire body and then just edit the face to how I wanted it. Once I did this though, it basically broke my animation.


After getting this result, obviously something wasn't working as it should. After trying to find help on the glitch and trying many different work arounds I eventually found that the reason why my model was doing this was because obviously my morph target was posed in animation, so once put on the keyframe where my morph target was in the same animation as the original model, it would basically double the animation. This is why it looked like this.
This only means that my morph target is now sort of my animation slider. This is not ideal but it still works and I will just have to be even more careful next time so that my character has a proper animation slider.
However, for this project this is suitable and I have a fully rigged and posed character with a facial expression. Without this I think it would have made the character look a lot more "dead". I am looking forward to seeing this character fully lit and properly presented.


Tuesday, 14 December 2021

Texturing the Captain

 7-14/12/21 - Week 10/11

For the past week, I have been texturing my character which has gone mostly well. At first, I felt a bit stumped in stylised texturing since I have only really done it for environments and I needed a bit of a refresher anyway. I decided to make a small mood board with the sort of texturing I wanted to recreate. I also ended up watching a few tutorials to try to take some tips from it. What I found was that stylised textures, even in characters have quite a lot of pre-baked shadows and highlights to really emphasise the edges and crevasses. I was mainly researching for the face on my reference board as I felt this was one of the most important places to get correct as this is one of the most stylised areas.

So, after intaking this information I started with the face. I think this is probably the most successful component of the textures as I spent the most time on it and added the most detail. Something I really struggled with was roughness variation, I couldn't see much of it on my references but I knew I needed to add at least a bit to convey how skin looks properly. I hope that I have ended up with a reasonable balance that is both realistic but stylised enough to fit with the style I went for. I also did some tweaking on the amount of detail I was adding, initially I added a lot of freckles and not as much shading but referring back to my references I found that it was a lot more heavy in terms of lighting and not at all as heavy in flaws. Changing this definitely helped me to get back to the smooth, stylistic presentation.


I then tackled the hair which was interesting, I decided to make it a metal and play around with the roughness that way as it would create an interesting sheen that I could see in my references without the hair looking wet. If this doesn't work out in unreal the way I want it to look I will instead try perhaps creating some form of shader on it, as I would like to keep the metallic sheen.


With the jacket, I had to play around with some of the segmentation a bit since I wanted to include some of these block colours to break it up a bit. I ended up having it along the bottom of the sleeves and jacket. I liked this as it mirrored the boots ending off the hip waders.
I also needed to add in the fish logo on the back, in the end I went for a cartoon Atlantic salmon, which is the same type of fish as the hat. This was inspired by an image I found, I redrew it, trying to keep the same flow of the shape whilst also adding my own twist on it to make it a bit less cheery and a bit more similar to my own style.


In terms of the props, I have ended up switching up some of the maps. I realised I made a mistake as I'd counted the hip waders as one part instead of two different pieces, so I ended up with no space for the hat. I moved this to the props and this worked out quite well, though this will make it probably need a 1024. This should be ok though I will need to readjust some of the sizes of the maps and perhaps make more maps have a normal and roughness one size smaller.


The clothes weren't too hard to tackle as it was mainly just finding the right balance between the amount of detail and roughness variation - still including detail and grime so you could tell she deals with fish and works on a boat, but at the same time not adding too much to make it look more in the semi-realism range. I ended up just adding a lot of detail highlights to make it look sun damages and some drops of water/grime around to show that her clothes were slightly wet and had some fish oils on her.
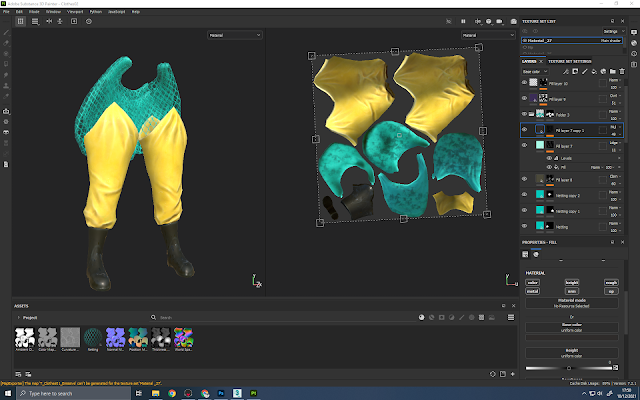
For this set specifically, I made a material in designer for the netting. Initially I was going to make this from scratch in max but doing it in designer turned out a lot easier, but I did have to play about with rotation and how the seamed linked together a bit more. I think in the end it looks quite good though.

I then went on to texture the props for my scene, this wasn't too difficult and I just used the rules I did before so that the stylisation matched each other. I added some puddles onto the ground and I think this added a nice level of detail and represented that it was supposed to be near a port/the sea.


Overall, texturing was pretty fun but did have some challenges and needed me to think a bit more about how I was approaching things. I am happy with how my character is looking in marmoset especially with the props, which I will properly arrange in unreal. I am hoping that the textures will look similar in unreal as sometimes I find that it is a bit shinier than in marmoset. I would set up the unreal scene but I am very quickly trying to get these textures done to a reasonable standard as I will be going home soon and it will be harder for me to complete work.
Here is how my character is looking in marmoset for the mean time:


Monday, 6 December 2021

Captain's Colour Scheme

 06/12/21 - Week 10

To prepare for texturing my character this week, I needed to finalise on the colour scheme. Using my initial mood boards and ideas, I tried to pick colours that would help the instant recognition of a fisherman that also made each part of my character stand out on it's own for a clear read.
This ended up being a lot harder than I first thought and I couldn't find the right balance between light and dark colours on the clothing. I recognised that a lot of the reference I had included bright, vibrant colours as this is very important at sea for a multitude of reasons. The high-vis fisherman jacket is very iconic so making this something that stands out was very important, though this would drastically reduce my options for adding vibrancy and colour variation without harsh clashes.

I first started with this, this was the sort of colours I was originally thinking of and I really liked the idea of the yellow jacket with ginger hair as they would work well together. Though already I was finding problems with balance. Here, though the jacket, hair and rope works well, I found it hard to start adding in more colour variation in the rest of the clothing as it would start to drown out the yellow and orange, or take away from these important parts of the design.
 

My second idea was to sort of go off of one of the reference images I had that had a character from a pre-existing game that was also ocean/sailor based. I did like the jacket and the hair again here, though I felt pretty set on somehow getting ginger hair to work. The orange being included in the jacket was appealing, however it made it difficult to get more dark colours included from the dark of the hair, as this would just make nothing stand out apart from the jacket and perhaps rope.


After getting some help and feedback, I ended up with something a lot closer to what I felt was going to work. Increasing some of the vibrancy and getting some more tones in really helped in the end. The vibrancy in the jacket made it stand out a lot more but the other colours I was choosing was still letting them speak. However, I still felt that I could improve from here.


Just to test some things out and with some more feedback I decided to try a green for the waders and jacket. I just felt that this didn't shout ocean fishing as much as the yellow or orange jacket, however. But I do think that this sort of scheme could have been viable if my captain was a river or lake fisher as this sort of colour is much more typical of that.


Going back to the previous ideas, I tweaked some things and made it a bit more my own and I felt these colours I picked here were pretty good. I still feel like they aren't perfect but during some feedback I was told to maybe play about with adding some variation on each piece of clothing, I didn't have enough time to test this out today but I will definitely add this in to my textures as this will add another layer of detail and separation. One of the reasons why I chose this is because of the colour of the ropes, they stand out from each other and are very alike colours that I have in my reference.


Now that I have decided on a colour scheme I can move on to texturing so that my character will be ready to be rigged and skinned soon. The colours is something that I struggled with since designing the character but doing it quickly in marmoset really helped me to work it out with a bit more ease.


Saturday, 4 December 2021

Editing my Plan

 04/12/21 - Week 9

Just to finalise this last push of the project, I have decided to switch about my plan a bit as some of it seems a bit unreasonable or too difficult. This should give me a bit more time to texture each project as I've realised I didn't count for creating materials and baking onto planes for the cart project, so there is more to do here and figure out.
I have also switched the order of my cart and character texturing and made it so I have a bit less time to present since I have mostly completed the cart's unreal scene which I didn't originally plan to do. I have also left a bit of wiggle room for texturing as I know that rigging will not take me more than a couple/few days.
Hopefully, this should allow for a smooth end to the project with not too much stress.


Wednesday, 10 November 2021

Unwrapping

 08-09/11/21 - Week 6

These past couple of days have been used on unwrapping my character so that once I revisit it in the coming weeks it will be ready for texturing straight away. With the texture limit of 1024 per meter, I decided to spilt my character into 5 maps - 6 if you count the eyes; Skin - 512, Hair - 1024, Clothes - 1024, Clothes 2 - 1024, accessories - 512.  With these texture maps this should create just under 2 x 2048 which I'm hoping is reasonable, from what I've read this should be alright though I am prepared to further reduce these if necessary. I decided to split the clothes into two different maps to fit the textile density since they would have needed a 2048 to fit the resolution - but splitting it into two means I can get enough resolution on all of it to have two 1024 which is much better space wise.


Thursday, 4 November 2021

Retopping

01 -05/11/21 - Week 5

Retopping was quite a long process but I felt a bit more confident with it than before.
Sculpting the face was probably the easiest thing for me as there are clear animation loops to follow since most humanoid faces have the same features in the same places, so to find reference for this it is very easy. At first, I went very lop poly with the face but then using open Subdiv I made it a bit more to the poly count I was thinking, obviously the face is the most detailed part of the topology in general so I was free to go a bit more dense here. I'm happy with the topology though I'm really hoping the feedback that I get from the hand in will tell me if there is things that I need to adjust since I still feel quite inexperienced with retop and some of its rules.


Moving on to the rest of the body, I did start to struggle a little bit as this is where topology can really vary and it is ultimately decided on the clothing the character is wearing. Thankfully, I found some very helpful topology references (mainly Wattson from Apex Legends, created by Sam Sun) that somewhat mirrored the type of clothing that my character is wearing and used this to help me. The waders was probably the hardest here as obviously this was not something that I could find reference easily so I just had to follow the rules I was noticing from the sculpt I was mainly basing my topology from. These were, have more topology near a seam/edge and if a fold is very prominent, add some more topology for it to have more effect on the silhouette.
Something that I have decided to do that is different from my second year character is to only retop what will be visible by the player, such as the fact that the chest waders don't have any back etc. I think this is reasonable but I am again hoping that if it is not that it will be noted in my feedback.


The hair was probably the most time consuming and difficult part of the sculpt. I decided to make it mostly one mesh, separated at each hair tie. The top part of the hair was probably the most difficult as I decided to make this part asymmetrical due to the difference in fringe. It took me a long time to figure out some of the pieces to retop since they were so varying in size, shape and depth. One thing that I think did play to me was the fact that they are so angular as this meant that each strand only had to be 2-3 polys across each. 
One thing that is really frustrating is that I felt that by the end of it my topology doesn't look too clean and there is a lot of rectangles. The hair is definitely the most high poly aspect of the whole model by this point so I'm not sure whether to add in a few more loops to make things more square and neat or if this is just adding topology to areas where it wont show. It was also very time consuming in the first place and to add more time fixing this may be a problem, though if it is not good enough of course I will need to spend more time on this.


One problem I have encountered that I am not sure how or whether to fix is the overall tri count is rather low from what I expected. My initial goal as mentioned was 30-40k however with everything retopped now, I am only really just hitting 30k. I am hoping this is still acceptable and realistic for the character I have created.
Other than the problems that I have listed I am done with the retop of the character, I am hoping to have it unwrapped by the beginning of next week so I am all ready for texturing once I get back round to this project in the coming month.


Tuesday, 26 October 2021

Creating the Props

 22-29/10/21 - Week 3/4

At this point in the project, all I have left to finish off is the props, this includes for the clothing and also for the small scene that I want to place my character in. This is what I have in mind for the scene:

I'm hoping that this will add a bit more story and fill out my character a bit more. It's only a few things too so I thought to quickly finish these to have an overall more impressive, finished example of my work.

I first wanted to get the character herself finished off sculpt wise ready for retop as I was aware of the quickly approaching first batch of feedback. To make the belt buckle, hook and straps for the waders I first started in 3dsmax. I feel a lot more comfortable in max to create good looking hard surface as I find z modeler a bit finicky sometimes, so to be quick I didn't want to start testing out my skills with this.

Here is what I made in max, as you can see these are quite hightop as I wanted to get some nice and smooth edges and some detail in for the sculpt, I then want to go back and create a low top for these as this just makes more sense and is easier for me to work out, as they are quite simple I don't think the retop would take particularly long either. These were just created in a simple process and then given more topology and smoothed out with turbosmooth.


Once imported into zbrush I placed them in the correct position and slightly adjusted them to fit the sculpt. Overall, I think these look how I wanted them to and really have filled out the sculpt a lot more, its much more alike to the concept so I'm pretty pleased to see the sculpt in a much more finished state.


As for the ropes and netting this was a bit more complicated since its quite a difficult thing to try to create. For the netting around the waist, I was at first thinking about trying to create the cris-cross pattern onto the netting in 3dsmax by using a method I found in a tutorial but after assessing how complicated it was I have instead decided to make my own texture in designer and place it onto the mesh. I am hoping I will still be able to get results that I am happy with this way.
Following the method I had in my head, I first started in Zbrush and sculpted in the shape I want for the netting. Initially I was going to use just one subtool for this but after thinking about it a little more I decided it would look better if I demonstrated that there was more than one net there since you will be able to see through them. This will hopefully fill the space a bit more and make it look more realistic.
For the ropes, I also did these in Zbrush by using another tool that creates a curve topology, so this was a bit more simple. I also used the move brush to manipulate the shape to exactly what I wanted.


Moving back into Max, I first started by adding the buoys onto the ropes for the finishing touch. At this point, I also need to bring up some of the obvious cuts I have made from the initial design due to time reasons. I have decided not to add the ropes around the arm as not only did I make an error with spacing here so it would be really hard to add in, I don't think it adds an awful lot to the design and I think it is still successful with or without this piece. I have also not done the smaller pieces that were hanging from the belt, again I don't think the design suffers too badly without these pieces and due to time in general it makes sense to leave this out. Ideally, I would have liked my character to include all of these smaller details and I perhaps will try to include them in the future, but for now I believe they are reasonable sacrifices.

Next, I focused on the scene I sketched out earlier and created the low poly for the barrel and planks in Max. I then took these into Zbrush and worked into them to create the high poly, here I also created the fish sculpt that I would use to duplicate into the scene. I did end up changing the shape of the planks overall to be a bit more appealing but other than that this was rather simple.


I also quickly duplicated the fish into the barrel so it can be made into an alpha and retopped both the solo fish and the ones in the barrel to get ready for the retop in general. I plan to arrange the fishes in unreal as this makes a bit more sense to me.


In terms of progress, I am a bit behind at the moment. Referring back to my plan, at the moment I should have finished all of my props last week though I have only just finished. I am hoping to catch up and get as much retopping as I can done for hand in on Friday as I feel it is a good point to get feedback at as sometimes I do struggle with my retopping. If I do have to continue retopping into Week 5 it is not too much of a problem as I have only assigned myself the unwrap for that week as I have to go somewhere where I won't be able to complete much work. I can push the unwrap a bit further into the next week and just work at it slowly over the period of time I am sculpting the next project.
Hopefully, I can get as much done as I can and it won't cause too many issues.

Soft Blue - Final Review

06/05/22 - Week 17 Now that I have finished my projects I will review them over and see where I went wrong, could have improved or what I am...