Sunday, 24 April 2022

Nia, Boatswain & Blue - Rigging and Skinning

 18-22/04/22 - Week 15

This week I managed to rig all 3 characters. Unfortunately, I fell ill with covid at the end of last week so it did effect me this week and slowed me down. Thankfully, rigging and skinning didn't take as long as I thought it would for each character, so it balanced itself out time wise.


I first started with Nia, this was probably the easiest of the 3 to rig since she has a much more basic design that is tight fit. However, I did come across some issues one of them being my lack of thought into what to delete from each character - wasted tris - which ended up effecting me for another character as well. I think overall something that has effected me in all my projects is lack of forethinking which is where things like wasted planes really show up and make me use more of my time trying to fix these problems.
In the end it wasn't too problematic and I managed to get through rigging this character with relative ease by using a couple of extreme poses to try to get the best rigging I could. I then roughly put her into the position in the concept to get an idea of if my rigging was going correctly and where to adjust. In the end I ended up with the pose below:


Next, I started on the boatswain. He didn't really have much of a problem with planes that I didn't delete since the base of his character is probably even simpler than Nia's. I used the same process mentioned to work through the skinning process. Though what did trip me up was the belts and also the sagging on the pants. The belts took a while to get through and I ended up changing where they were rigged too a couple times but in the end I managed to get it looking decent. I also used a prop bone for the first time on the guns which was interesting but made things a lot easier for the guns that I planned to move with the hands. The trousers where a bit of an issue and I was trying to balance things between the thigh bones and the pelvis but eventually I got the hang of how weighted it should be to each of these parts.

This was the pose that I've settled with for the moment:


Finally, I moved on to Blue. As expected, this did take me the longest as she is the most complex. This is also where the problem about faces that I didn't think to delete became problematic as things like the neck had two layers that was really hard to access, and trying to see through the mesh when there is so much going on is really difficult. This also happened with the skirt and the shorts even though I couldn't really delete anything here to help cope with this anyway.
I added ponytail bones here, I ended up using 7 on each side as my previous project I tried to minimise on the bones and it created a very clunky look. I then also added extra bones for the wings which I also haven't included before but these were very simple to deal with and made skinning the wings very easy. Lastly, I also included a prop bone for the bells since they are attached to the hand.
I struggled with the skirt and parts hanging from the body a little bit since I wasn't sure where I wanted to rig it too but in the end I settled with mainly the pelvis, but had to do some small adjustments on the parts that touched the body. I also had to mess around with the bodice too as I had a very similar problem. 
Here's her pose:


Overall, I'm really happy with the rigs that I managed to create this week and I think it's going to be a good base for my animations next week, though obviously its pretty easy to adjust if I need to.
My plan for next week is pretty similar to this weeks, around 1.5 days per character for both morph targets and animation which I plan to do all by hand. I haven't animated before so it'll be interesting but hopefully I'll get a good result.


Sunday, 17 April 2022

Nia, Boatswain & Blue - Engine

 13-15/04/22 - Week 14

To finish this week off, I have just been in engine and creating some basic lighting setups and also some plinths for a couple of my characters.


I didn't tweak Nia's lighting all that much but I did add a small base for her to stand on and some of the feathers. I decided to approach these plinths by mirroring what's in the concepts or something of the like, so Nia's was quite simple. I still want to add the crows in which I unfortunately didn't manage to make progress on this week.


As for the boatswain, I'm still considering my options with the plinth as he doesn't have one in the concept, though he does have a graphic behind him and a shadow in front - so I am hoping to have something of the like in this presentation. As for lighting, I wanted to keep it quite simplistic and not too colourful alike the concept. Looking at this screenshot now I am thinking it may benefit from a stronger rim light possibly on both sides, so perhaps I need to stray a bit from the original concept here for presentation purposes.


For blue, I found a concept by the same artist that had a fairy-like feel and tried to take inspiration from the ground included there. I think this really ties in nicely with my character as its very foresty and I like how the colours don't take anything away from her. As for the lighting, I again realised it wasn't too contrast-y or had much colour in it at all. This makes me think with these two characters I will be using quite a bit of post process to play with the contrast and saturation to try to get the effect I want. Again, looking at this now it would definitely benefit from either a rim light or a visible main light source.

Moving on to next week, I need to start implementing the poses and animations for my characters so this will mean rigging. I am a bit concerned with rigging especially for Blue since she is quite complicated, so I have left the whole week for rigging. That means about 1.5 days per character.


Friday, 15 April 2022

Blue - Texturing

 04-12/04/22 - Week 13

This week I worked through my final character to try to finish the main textures for all 3 characters.
I planned a day to finish off some of the retopping and uv mapping that I had left to do for this character, but it ended up cutting into much of my time and I didn't finish getting everything ready until halfway through Tuesday losing a bit of time there. I wanted to really improve on what I was saying last week and really reflect the style of the concept into my texturing work.


I think I succeeded much better this week, I used the shadow and highlights much more efficiently from the concept for this character and also really tried to understand the shading techniques the artist uses. This was really beneficial, as I started to use the sketchy shading that the artist uses in my textures my model was looking accurate and also aesthetically pleasing. I did struggle a bit with keeping up with all the different layers I was using in painter and how this was effecting my roughness overall, but eventually I got a bit more used to it.
I also used a lot of metallic in my textures to make a shiny effect for things like the horns and hair which really helped the piece to come to life a bit more. This was supported by the highlights that produced a fake sheen that helped a lot with the material reads. I also think this technique sort of covered up the fact there was not much ware and tare where there usually would be, as the lines add a lot of texture to the piece without actually doing so.


In the end though, this method did take me a while as I was basically hand painting each asset and this character has a lot of assets so I ended up cutting into my time quite a lot and my plan ended up being thrown out the window as I had to continue texturing into the next week which was rather frustrating as I now won't have enough time to do certain things such as the crows for Nia, even so I do intend to find time for these.


Overall, a much more successful week or so, where I am a lot happier with the outcome of my texturing. I think if I get time I want to revisit the Boatswain and try to implement the skills that I built here to try to improve the textures there. I don't have too much of a plan for the next few days, I just want to get all 3 characters in engine properly and add some details such as the plinth or asset they will be standing on.

Sunday, 3 April 2022

Boatswain - Texturing

 28-01/03-04/22 - Week 12

This week I have completed the textures for my second character.
For this one I took a bit of a different approach since the style of the concept is quite stylised and I wanted to show that more in my texturing. I tried to apply shadow and light in the areas that the concept does to try to improve the overall accuracy and likeness.

I ended up struggling with this quite a bit and had a lot of passes to get the effect I wanted, looking back on it now I just needed to go in strong from the start instead of trying to make it still look blended and soft which isn't really like the style I'm following at all. I think in the end I started to take a similar approach that I did to my previous character.
I also was struggling a bit with the amount of roughness variation and ware to add to my character, I struggle with this as a whole for stylised pieces as I find that dirt is usually either very obvious or not at all present and I found the latter in this concept even though in reality you could imagine that the clothing and accessories would be much more worn. I tried to get a good balance here but I think I have been thrown quite off path with this character, I could try to improve this but with the time left I need to first get the more major aspects out the way before going back over this for another pass.

Probably the part I am most happy with is the skin since I feel I managed to achieve a good roughness to produce a quite accurate look.

I did try to get a bit more dirt in on the guns and looked through a lot of reference for stylised weaponary and how they include ware, I found that most of it was placed in during sculpting, such as scratches, so I definitely will keep this in mind next time. I think I didn't really think about this as the weapons appear so clean on the concept. Adding a little bit of dulling on the barrel of the gun helped it look a bit more natural I feel.


I think texturing this character has really made me aware of the lack of likeness that I have achieved on this project, I don't think my sculpt is as strong as the other two and texturing has not helped this as much as I would have wanted, so I am overall a bit disappointed. 

My plan for next week is similar, just work through the week and get the textures done as I go:


Sunday, 27 March 2022

Nia - Texturing & Engine

 21-25/03/22 - Week 11

This week, I moved onto texturing. This is something that I was quite looking forward to as texturing is one of my favourite parts of the process as I feel that it really helps the character to come to life. I also managed to get Nia into engine this week and create a hair shader that hopefully suffices.

I first started this week by unwrapping as I have not yet finished this for any of my characters due to retopping taking longer than expected. I decided to go with a plan for the maps much a like my previous character project though taking a couple more liberties. I plan for most sheets to be on a 1024 which should result with just under a 4k map for each character - our max budget being 2 4k maps but I do not feel this is reasonable at all for stylised characters. Hopefully this will make my characters visibly game ready. Noting this - I ended up with 4 sets of uv sheets - not counting hair - Eyes, skin, clothes 1 & 2.


I then began texturing, I really wanted to push the contrast and mystical nature of her outfit. I created a bit of a glittery effect on her clothing using a couple of grunges and hand painted a lot of shadows in. I also painted in the patterns on the sheer part of the top in substance too, which ended up taking a while.
This also brought to my attention that I didn't really plan the top correctly, I should have just baked in the folds onto the skin itself and then just created the patterns using height in painter, as I feel in the end the sheer top doesn't add too much depth as I'd hoped.
I slowly moved through the week and worked my way through each asset, then nearing the end of the week I went back and tried to improve certain parts after looking at it all together in marmoset. This is where I currently am though obviously I have left an extra week for texturing that I plan to go back over things if I see fit.


I then placed her into engine and started applying textures and lighting. I wanted to try to get a quick idea of how I was going to place the lighting and how it would effect the textures, so I just came up with some quick lighting placement. Some of the reference lighting was a bit unrealistic so I did have to make some small adjustments, looking at the screenshot now I think it is a bit too bright so I need to find a balance as I don't want things to be too dark to not be able to see the textures.


As you can see in the screenshot, I have also implemented a hair shader. I followed a tutorial from the same person - UIW 3D Animation and Game Design - that created the designer hair generator, you can find this & his channel here:
https://www.youtube.com/watch?v=elQO-dV1fYw&t=633s
https://www.youtube.com/channel/UCtPWysj7NXUFvjqrnGGC9VQ
This hair shader includes the ability to change a lot of different options on the hair very easily without having to save out - a material instance - which was super helpful as it allowed me to get a close colour to the hair which is quite hard to pin down in the reference. I am thinking of swapping out the emissive to a texture that has multiple colours as the emissive I feel is a gradient of sorts. But for now I feel this works and is a good reference. It also uses a node that I haven't used before called DitherTemporalAA which in essence does the same thing as dither in marmoset - making some of the grey areas of the alpha map black and others white to create a gradient without having to use a more expensive method and I was also able to use the hair shader in unreal with this.


I ended up also using this node for the top too - I was originally struggling with this as I wanted it to be sheer to be able to see the skin texturing. This really made me think that I had done the wrong thing and I was considering deleting that part of the arms or top all together but I saw this as a bit of a time sink, instead I used dither to create the amount of sheerness that I wanted which was super helpful and saved me a bit. This shows that I need to think a lot more before I begin these sort of projects and understand the restrictions of unreal and how this will effect my project - if I'd have done this I could have solved this a lot easier and it wouldn't mean I have topology on top of itself for sake of shadow when this can just be faked - especially in stylised.

Next week I will continue texturing by moving on to my next character, this is my plan for next week. Now I have seen that I am able to texture a bit faster than I thought I am hoping that I will also be able to get this character in unreal to save time later on so I can focus a bit more on technical stuff if needed.
I have also left Monday for unwrapping.


Sunday, 20 March 2022

Learning and Placing Hair Cards

 14-18/03/22 - Week 10

This week I focused on hair cards, as I lost the week that I was supposed to be learning them I needed to catch up and try to research and understand the method of hair cards as quick as possible so I had time to place them.

I firstly began trying to find tutorials that I understood, I saw several methods being used, the first being creating the hair strands for the haircard alpha itself using Xgen. Xgen was used to place a small amount of hair on a plane and then arranged to create segments of hair, these were then placed by hand. The next method was to place the Xgen strands by hand onto the scalp of the mesh and then generate the planes themselves that way, this would also include the first method. I saw another variation of this using designer to create the hair strands and then use Xgen to generate or Maya/Max to hand place these.

I first tried the second method mentioned, I followed a tutorial by UIW 3D Animation and Game Design which you can find here:
https://www.youtube.com/watch?v=D1XwvcMTIfQ&list=PLklk5VvcgwJCTorNMvCWx_Faby5ZQ-3Wr&ab_channel=UIW3DAnimationandGameDesign
And find the channel here:
https://www.youtube.com/channel/UCtPWysj7NXUFvjqrnGGC9VQ
This tutorial followed setting up in Maya for Xgen and creating your scalp asset then drawing on curves to convert into strands for the hair to follow. This wasnt too difficult though I hadn't used Maya before so there was quite a bit to learn before I was ready to get into it properly. I initially did a test run using this method but maya ended up crashing and as I learnt it doesn't autosave unless you turn it on and most people don't use this due to Maya's limitations and heavy storage usage.
I then tried this method again the next day and came out with an interesting result, though I could already see this being somewhat difficult to understand and use to create the shapes that my character's hair has.

Initial testing,


With a few tweaks and trying to use masks and many other intricate methods I came out with this result which I was definitely not happy with. I found Xgen had a lot of limitations when trying to use it this way and this method overall was not the right one for the type of hair I was trying to create. With this in mind and not wanting to spend too much more time on trying to work with Xgen this way, I went back to the drawing board and tried to think of a better method. I ended up doing more research into haircards and asking some other character artists and found that it was more of a common thing to use Xgen purely for the hair strand generation and not for the hair cards themselves, these are usually hand placed. I thought this was quite surprising but once I had experienced Xgen this way I really understood why this was the case. I was very glad that I had learnt it in a very basic manner though as I thought it would be much more complicated than it in fact is.

I then debated my options on whether to create the hair cards using Xgen or designer, I think in terms of reliability and getting the effect you want Xgen is a much better choice and with the knowledge of Maya and Xgen that I now have I could definitely follow a tutorial and create Xgen hair strands. For sake of time as I had lost a lot trying a method that in the end just didn't work out, I decided to go down the designer root for my haircards. I used the tutorial mentioned above to direct me here and I was able to create a hair generator which I then created many different hair variations of my own want.


Once this was completed I went into Max and began to hand place the cards. At first I really struggled with this since it didn't make a whole lot of sense to me how the hair on my ref was actually working or would work in a 3D space. I found a lot of reference and tried as hard as I could but in the end it wasn't looking how I wanted it to and I was growing very impatient with it.

My first attempt.

I then tried again this time with more and better reference that mirrored the style of the hair on the reference a lot better so I could sort of understand what was happening. I was mainly struggling with the volume of the hair but I solved this by adding a lot more layers and faking it with the curve of the hair. I then added in a lot of flyaways and general detail to come up with a somewhat similar version of the hair as to the original reference. I did struggle mostly with the back of the hair and looking on it now I think I can think of a lot of better ways to have approached this, since I have never placed hair cards before I think my effort is alright and I know I can do better if given more time and another chance.


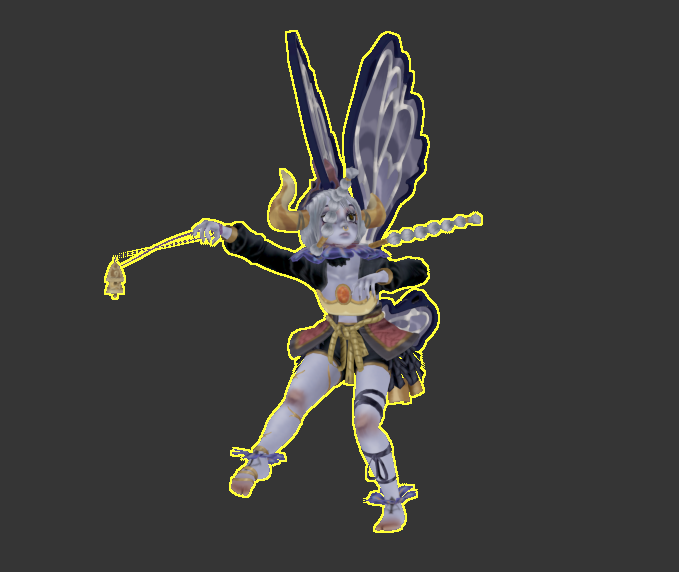
Here are the results in marmoset viewer, I think with the shader and colour applied to it it looks a lot better than it does in Max and I am actually quite happy with it. Seeing it on my character is really cool and I am happy that this is starting to come together now as I can finally see some progress again. If I get more time I do want to work further into the hair and add some more flyaways and work on the overall placement of the hair. 


Next week I will move onto texturing so I will be continuing on with Nia, I also want to try to create a hair shader for her in engine so I can start to plan how the character is going to look presentation wise. This will also direct me if I need to extensively change anything to do with the hair.
Here is my plan:


As you can see I hope to be finished around mid week so I can have time to make any adjustments and put Nia into engine to round off the week.

Sunday, 6 March 2022

Blue - Retop

28-04/03/22 - Week 8

This week I have been retopping my third character. As I anticipated last week, this ended up taking me a long time and by the end of this week I haven't been able to finish as much as I wanted to initially.

The large majority of this retop was again similar to the previous two characters - creating a rough base and then using turbosmooth to get a good amount of loops. I did end up having to work around a few issues, one of them mainly being the wings which as first I wasn't sure quite how to approach, but I ended up using a very similar method except I just had to be very careful with the placement to make it make sense and work with turbosmooth properly. They are currently very high poly and this needs to be fixed, though I am hoping once I collapse the symmetry on it I will be able to remove unnecessary loops and lower the tri count here.


Another thing I struggled with was the hair, I tried to do some more research on stylised hair and how people usually approached this, though I found that the method that I used for my professional practice character was mostly correct, but I needed it to be tided up a lot more and more evenly spread out. This was a challenge as starting with a low amount of polys then adding loops in didn't appear to work since the geometry that the low poly was conforming to was so complicated and not at all smooth, so I decided to hand retop this. The issue with this is that it took me a very long time and I have now only managed to finish both ponytails, one side of the hair and the fringe. I decided to segment the fringe to try to make this a bit more logical and this really helped in comparison to ways I have done it before - trying to keep everything in a large lump. I also hope this will help with the hair looking more natural. I did consider hair cards for this but I thought as I'd already tried hard with the zbrush sculpt I wanted to keep these, though I am maybe going to make the fly aways into planes.


I have mostly finished everything but I just need to create the low poly petals and place them correctly and then finish off some bits and pieces, but for now I need to move on to hair cards as I have been told that these are very challenging and meticulous. Overall, I think I made good progress and I tried really hard to get as much done as I could this week.


I am away next week, so I will come back the week after and start haircards, I don't have much of a day by day plan as I'm unsure how long each step will take and what each one will be, but here are my theoretical goals for then:


Soft Blue - Final Review

06/05/22 - Week 17 Now that I have finished my projects I will review them over and see where I went wrong, could have improved or what I am...